
Fringe benefits
A fringe isn't just a decorative element; it's a statement. Whether you're looking to add a bit of texture or aiming for that boho-chic vibe, a fringe can be the perfect finishing touch.
This addition can transform the look of your blankets, shawls, cushions, and wall hangings, giving them a unique and finished appearance. Here we give you the skills you need to achieve this simple technique.
Adding a fringe is also a wonderful 'stash-busting' project to use up leftover oddments from a recent project. (If your yarn corner needs a bit of love first, take a peek at our guide to Taming the Stash: 3 Strategic Systems for Yarn Organisation).
Below, I'll walk you through the simple, repetitive steps to achieve a perfectly neat fringe. Grabbing a crochet hook and taking a few quiet minutes to add a fringe can feel incredibly grounding—a true flow-state practice.

1. Prepare Your Yarn: Cut pieces of yarn that are twice the length you would like the finished fringe to be. I like to wrap my yarn around a piece of stiff cardboard (like a notebook cover) to make cutting multiple uniform lengths quick and easy. Fold these pieces in half to create a loop at the top.

2. Insert and Pull Through: Working from the wrong side (the back) of your piece, insert your hook through the stitch where you want your fringe to sit. Catch the folded loop of yarn with your hook and pull it through the fabric just enough to create a small loop on the hook side.
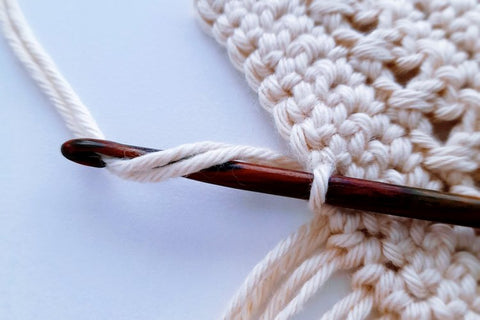
3. Wrap and Pull: Bring the loose ends of your yarn up and wrap them over the hook.

4. Draw Through the Loop: Gently pull the hook to draw the loose ends completely through the folded loop.

5. Tighten and Neaten: From the right side, gently tug on the yarn ends to snug the knot up against the edge of the fabric. Use your fingertips to smooth out the strands and neaten the loop so it sits flat.
6. Repeat and Customise: Continue adding fringes across the edge of your project, spacing them as close together or as far apart as you like. Once they're all attached, give the fringe a gentle steam-press or a damp block to make the strands lie perfectly straight. Then, using sharp fabric scissors, trim the fringe to your desired length or shape—whether that's a classic straight line, a gentle curve, a playful wave, or a dramatic slant.
Designing with Fringes
Fringes offer endless opportunities for creative expression. You can play with contrasting colours to make the edges pop, mix different yarn textures (like combining a smooth organic cotton with a textured bamboo or recycled cotton), or even vary the thickness of the fringe bundles for a chunky, cosy feel.
If you are looking for a gentle, beginner-friendly project to practise these steps, our free Heart Wall Hanging pattern is the perfect canvas. It's a sweet, quick make that teaches you the basics of structure and texture. For those who feel ready to sink into a more substantial, rewarding project, our Nadir knitting kit offers a gorgeous challenge, where a hand-knotted fringe can beautifully elevate the final design.
Remember, the beauty of crafting lies in the details and the slow, rhythmic care you pour into each stitch. A simple fringe isn't just an addition—it's a way to turn a basic piece into something deeply personal and comforting. So grab your favourite hook, put the kettle on, and let's add some cosy texture to our crochet world!
Happy Crocheting!
Frequently Asked Questions About Crochet Fringes
What is the best way to keep a fringe from fraying?
Using a high-quality, plied organic cotton, bamboo, or recycled cotton yarn helps minimise fraying. If you're using a single-ply yarn, you can gently steam-block the completed fringe or apply a tiny dot of fabric fray-check to the very tips of the strands to secure them.
How do I ensure all my fringe strands are cut to the exact same length?
The easiest method is wrapping your yarn around a template, like a sturdy piece of cardboard, a thick book, or a small ruler. Simply wrap the yarn around the template multiple times without pulling too tight, cut along one edge, and you'll have perfectly uniform lengths in seconds.
Can I wash a project that has a fringe attached?
Yes, but you should treat it gently to prevent the strands from tangling or felting in the wash. We highly recommend hand-washing the item in lukewarm water with a gentle delicate-wash detergent, then laying it flat to dry, combing the fringe out with your fingers while damp.
How many strands of yarn should I use for each fringe bundle?
This depends on the weight of your yarn and the look you want to achieve. For a delicate, airy fringe, 1 to 2 strands are perfect; for a chunky, cosy statement, you can bundle 4 to 6 strands of yarn together in each stitch.